


MAD SR, s.r.o.
Školská 36
979 01 Rimavská Sobota
Slovakia
5 March 2026
A premium result doesn’t come from manufacturing alone
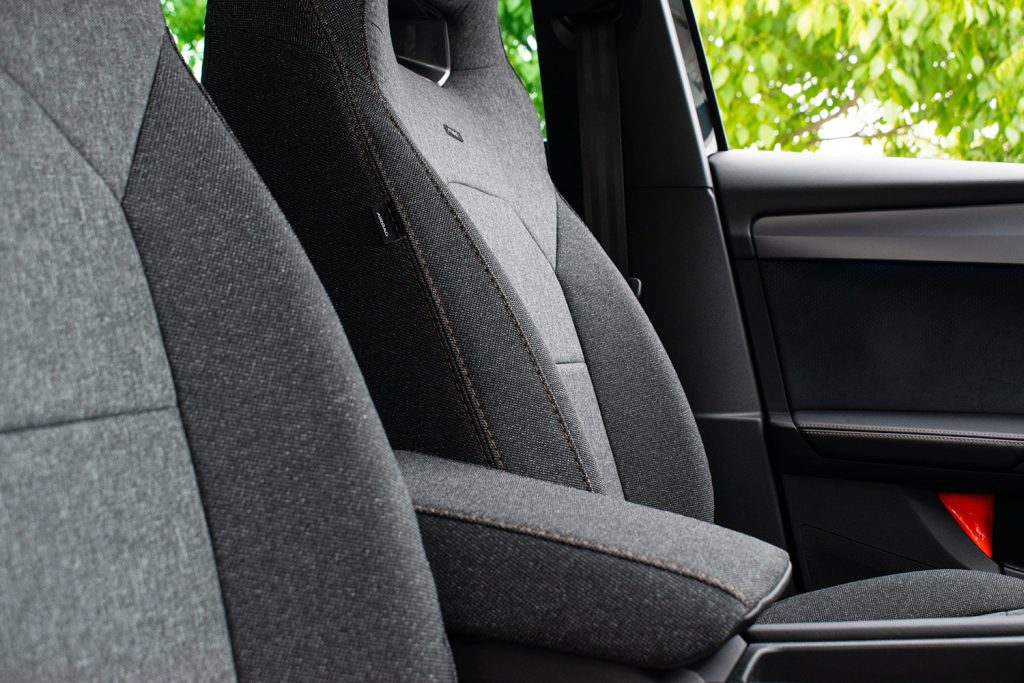
A premium car interior isn’t created only in production—it’s created the moment the seat cover is installed perfectly. With custom-made seat covers, installation is just as important as the product itself. It determines whether the final result looks factory-finished, holds its shape without deformation, and works exactly as it should. That’s why we follow a simple rule: every product has two parts—the seat cover and precise installation. In this article, we’ll show you why installation is key, what it influences, and what options you have to achieve a 100% result.

Why installation is so demanding for custom-made products
The difficulty of installing custom-made products comes from the fact that the pattern is designed with tight tolerances and is built around the specific seat shape and its mounting points. The cover can’t just be “pulled on”—it has to be fitted correctly first, then seated into the lines and contours, and only then tightened and anchored step by step, in stages, to create even tension without waves, shifts, or air bubbles.
Here, anchoring works like a structure that holds the cover in place and maintains its shape during everyday use. This process is exactly why installation takes time and requires manual skill, the recommended tools, and a space where you can work precisely without compromises.
Safety: functional features must remain functional (airbag)
Installation is critical for our products because a seat isn’t only about looks—it’s a safety component of the vehicle. For safety features like airbags to remain fully functional, the cover must be installed exactly along the intended routing and anchored at the correct points, without improvisation or “shortcuts.” If the cover doesn’t fit precisely, it can shift, twist, or create pressure on areas that must remain free to work as designed by the seat manufacturer. That’s why the installation process is set up so that once finished, the cover holds its shape, doesn’t “move” when getting in and out, and still allows all functional and safety parts of the seat to operate without restriction. In other words: safety isn’t a “bonus”—it’s the reason installation has to be precise and thorough.
Look and shape: why a cover deforms with poor installation
Even if the pattern and the product are made to 100%, the final look and lifespan are created during installation. With incorrect or incomplete installation, the cover won’t hold the seat’s shape—it starts to wrinkle, form “bubbles,” shift stitching lines, and over time it can deform locally, especially on the side bolsters and in the areas that take the most wear.
The reason is simple: a custom cover needs even tension and secure anchoring at every point, because the material works with every entry, exit, and body movement. Proper installation is therefore not only about aesthetics, but also about protecting your investment—it ensures the cover stays tight, precise, and premium after months and years of use, not just on day one.
A dedicated installation video for every pattern—so the customer follows the exact process
We provide an installation video for every pattern so the process follows exactly what was designed during the development of that specific cover. It’s not a “general” video—it’s a procedure for a specific seat type: where the cover goes on, in what order it’s seated into the lines, which points must be anchored, and what to watch out for so the result holds its shape and stays free of deformation. In practice, the installation video is the second half of the product: it reduces trial-and-error time, minimizes mistakes, and helps you achieve the same final result we deliver in our workshop. It brings the most value when used step by step—watch it fully in advance, prepare your tools, and then install exactly in the given order, without skipping the “small details” that actually decide whether the cover fits 100%.

What customers need to prepare if installing on their own
If a customer chooses DIY installation, they need to understand that with custom covers, preparation makes the difference. First, you need manual skill and patience—installation isn’t about strength, but about seating the cover accurately to the seat shape, tightening it gradually, and anchoring it thoroughly.
The recommended tools are just as important—especially trim tools for working along edges and details, and a socket set that makes it easier to handle seat parts depending on the specific pattern.
The third key factor is space: ideally a place where you can move freely around the car, keep things clean, and have the time to work without stress. If these three factors are underestimated, installation gets unnecessarily longer, the risk of mistakes increases, and the result may not reach the level the custom cover is truly capable of.
The most common installation mistakes (and how to avoid them)
The most common issue happens when customers try to rush the process or “finish it by force.” The cover may go onto the seat, but if the correct order isn’t followed, you won’t create even tension—and later the cover starts to shift, wrinkle, or deform. A typical mistake is skipping certain anchor points or not tightening them fully. It might look fine on day one, but after a few drives the material begins to move in the areas with the most wear. Another common issue is that the cover isn’t properly seated into the seat’s lines and contours, so seams don’t “sit” exactly where they should—resulting in waves, bubbles, and shifted stitching lines. That’s why we recommend installing exactly according to the video, step by step, without skipping details—those details decide whether the result looks like a factory original, or like a cover that the seat will “reshape” over time.
Installation options: DIY vs. certified partners vs. installation with us
We can handle installation in several ways depending on what the customer prefers—time, certainty of the result, or DIY installation. The first option is installing at home using the installation video for the specific pattern, which guides you through the exact process step by step. This option makes the most sense if you’re manually skilled, have the recommended tools, and have suitable space so you can install precisely without compromises.
The second option is our certified installation partners, who have experience with custom covers and can ensure the cover fits perfectly, holds its shape, and delivers a consistent result. The third option is installation directly at our MAD main factory, where we control the entire process from start to final detail inspection. In practice, it’s simple: if you want to install yourself, you get a precise video and guidance; if you want certainty and to save time, choose a partner or installation directly with us.

Conclusion
In the end, it always comes down to one thing: a custom cover isn’t finished the moment it leaves production—it’s finished only when it’s installed perfectly. Precise installation determines whether the seat’s functional features remain intact, whether the cover holds its shape without wrinkles or shifts, and whether the result looks like a premium “factory-finished” interior. That’s why we treat installation just as seriously as manufacturing—it’s the second half of the product, and it has to work together with the cover to create the final effect.
If you want to install it yourself, watch the installation video for your specific pattern, prepare the recommended tools, and give yourself enough time and space. And if you want 100% certainty without stress, use our certified installation partners or book installation directly with us at MAD. It’s worth it—when the product and installation work together, your interior becomes premium in a single step.
Contacts


1
-
Close

How can we help you? Select your language
- Online Slovenský jazyk
- Online Deutsche Sprache
- Online Magyar nyelv
- Online English language